Job Setup - Details Tab
This tab allows users to find details on the selected job.
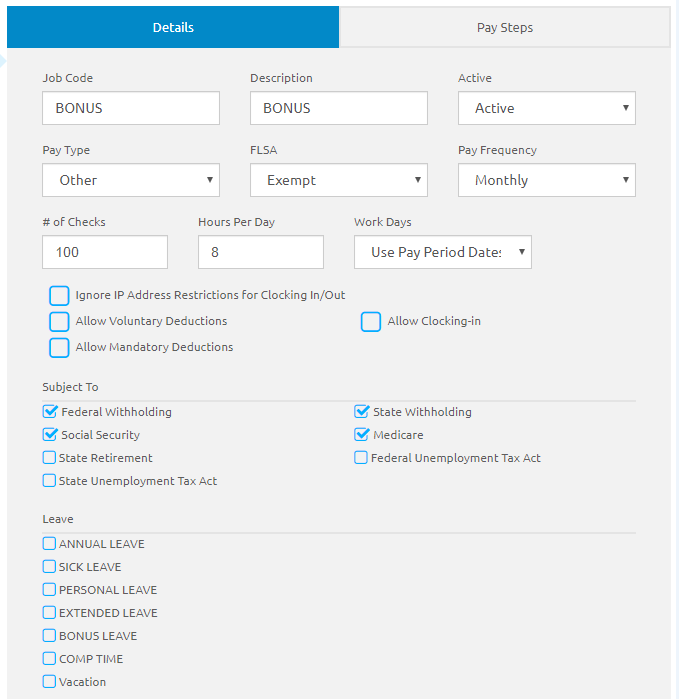
- The Job Code and Description fields will be automatically populated from the Add Job form but can be edited.
- Select Active or Inactive from the Active drop-down list.
- Active is the default.
- Inactive should only be selected once the job is no longer available and cannot be assigned to employees.
- Select an option from the Pay Type drop-down list.
- Select Overtime or Exempt from the FLSA drop-down list. This may be modified in Manage Employees on an individual basis as, needed. This will be pre-selected from the previous form.
If the pay type is Hourly or Hourly Substitute, the FLSA cannot be Exempt.
-
Select an option from the Pay Frequency drop-down list.
- Enter the normal number of checks this job gets in a year in the # of Checks field.
- Do not include the number of Escrow (Installment) paychecks received for the job.
- For teachers, the normal number of checks would usually be 10 checks per year. Non-teaching salary employees may receive 10 or 12 monthly checks per year or bi-monthly checks depending on how your unit is set up. If some of the employees receive 10 and the others get 12, two separate jobs need to be set up. This is used in combination with the pay schedule to calculate the annual pay when calculating taxes.
- Enter the usual number of hours worked in a day in the Hours Per Day field. Enter minutes as decimal values (7 hours 30 minutes = 7.5 hours). Hours Per Day is used for the following:
To calculate daily pay rates for salary and hourly employees.
To determine the amount of leave accrued based on the accrual rate.
To calculate the amount of straight time to be paid for a non-exempt salary employee working less than 40 hours but over normal hours per day.
To determine the number of hours to be entered for PTO days on the calendar.
If the usual number of hours an employee works is significantly different from the job’s hours, you should set up a different job for that employee. Example: You might need to have one bus driver job set for 6 hours and another one set for eight 8 hours.
- Select Use Pay Period or Use Value from the Works Days drop-down list.
- If Use Value is selected, enter the number of days in the Value field.
- Check the Allow Clocking-in box if employees are required to clock in.
- If the Allow Clocking-in box is checked:
- Check the Allow Clocking-out box if this job's employees are required to clock out.
- Select a Timesheet Approval Group from the Timesheet Approval Group drop-down list. This is optional.
The Timesheet Approval Group drop-down list only displays active Timesheet Approval Groups.
The Timesheet Approval Group drop-down list options are managed in System Settings.
- If a Timesheet Approval Group was selected, and one or more other employees hold the same job, a message appears asking the user if they want to implement the change to all employees with that job.
- When clicking the Save Without Updating button, employees with that job DO NOT get the updates to the Timesheet Approval Group.
- When clicking the Update Employees button, employees with that job DO get the updates to the Timesheet Approval Group.
- If the Allow Clocking-in box is checked:
- Check the Ignore IP Address Restrictions for Clocking In/Out box to allow any employee having that job to clock-in/out from anywhere despite IP restrictions that may be enabled.
- Check the Allow Voluntary Deductions box if deductions will be taken from this job’s pay.
-
Check the Allow Mandatory Deductions box to carryover deductions to an employee when the job is assigned to an employee.
- Enter the account code template to be used when overtime is paid for this job in the Overtime Account Mask field. Calculate Payroll will apply this template to the regular salary code when overtime is paid.
-
For Alabama Charter Schools, check the Include in LEAPS Reporting flag to indicate that the employee and corresponding job need to be reported in the LEAPS Report if the employee’s job is active for the period the report is generated for.
- If the Include in LEAPS Report check box is checked, once the user saves the record, a message will display asking if the option should apply to all employees with that job.
- If the Include in LEAPS Report check box is unchecked, once the user saves the record, a message will display asking if the option should be removed from all employees with that job.
- The check boxes in the Subject To section determine how the job is taxed. Check any Tax boxes that apply to this job. All boxes are unchecked by default.
- Check the Leave Types that usually apply to this job.
- Click the
 button.
©2021 | EMS LINQ, Inc.
School LINQ Help, updated 01/2021